THE ENTERPRISE DISK
SYSTEM MANUAL
Please read the installation section of this manual carefully before attempting to connect your disk interface and drives.
© Enterprise Computers Ltd. 1985
Scan: Zozosoft
OCR:gafz, 2005
No part of this manual may be reproduced, stored in a retrieval system, or transmitted in any form or by any means without the prior consent of the copyright holder.
All rights reserved.
EM10985
CONTENTS
4. What is a disk operating system?
5. Installing your interface and drives.
6. Formatting and using a disk.
B. Specifying and configuring disk drives
C. Working with a single disk drive
D. Working with an Enterprise 64
F. Using EXDOS system variables
The addition of an Enterprise Disk Interface and disk drives to your Enterprise system will open up a whole new area of computing experience. Your favourite games will load in seconds instead of minutes, you will be able to read data files from other computers and, using the IS-DOS disk, you will be able to run software designed to run under CP/M.
The Enterprise disk operating system is called EXDOS (Enterprise eXpandable DOS) and is both powerful and user friendly. It will resemble MS-DOS to the user familiar with this operating system, while those familiar with the standard Enterprise will find that commands for the use of tape, such as LOAD and SAVE, operate in an almost identical way when using disks.
Up to four drives can be connected to your Enterprise and these can be a mix of 3.5" or 5.25", 40 or 80 track and single or double sided. During operation, EXDOS performs checks on the drives to determine the number and type of drives present.
Please read the relevant chapters in this manual carefully BEFORE attempting to connect your system.
(MS-DOS is a registered trademark of Microsoft and CP/M is a registered trademark of Digital Research.)
IMPORTANT To get the most from your Enterprise'disk system it is important that you claim your FREE IS-DOS disk. Please fill in the registration card supplied with this package, clearly stating whether you are using 3.5" or 5.25" drives, and return it to the address on the front of the card.
CHAPTER 2. - CHOOSING YOUR DISK DRIVES.
The Enterprise disk interface is ' Shugart 410' compatible and can be used with most of the modern 5.25" and 3.5" drives. Appendices A and B at the back of this manual give a detailed description of the disk drive connecting socket, and specify the characteristics of drives compatible with the Enterprise.
It is also possible to connect certain types of 3" drive, although some modification to the connections may be required. Enterprise will not be supporting the 3" format when releasing disk based programs. It is not possible to use `dedicated' drives such as those designed for the CBM 64 or the Atari 800 series. The larger, 8" drives are also unsuitable.
Any drive considered for use with your Enterprise should ideally have its own power supply, as the Enterprise has no facility for powering drives. Alternatively a separate power supply could be used (see Appendix B).
As was mentioned in the introduction, the Enterprise can handle up to four drives and these can be a mixture of 40 or 80 track, double or single sided, 3.5" or 5.25". Your own choice of drive may be made on one or more factors including price, availability and the use to which your computer will be put. Disk based programs from Enterprise will be generally available only on the 3.5" format, although 5.25" program disks will be available by special request directly from Enterprise or their overseas distributors.
The amount of storage available varies from approx. 180K for a single sided 40 track drive up to approx. 720K for a double sided 80 track drive. Double sided drives are treated as one, larger capacity drive.
A system with 80 track drives can read and write to 40 track disks and double sided drives can access single sided disks. Obviously it is not possible to use 80 track formatted disks with a 40 track drive or a disk formatted as double sided on a single sided drive.
Maximum flexibility will be obtained if double sided, 80 track drives are used. Disk software produced by Enterprise will be available on 40 track, single sided disks and so be readable on all combinations of drive.
The two sizes of disk, 3.5" and 5.25", offer identical storage capacity for the same configuration. The smaller 3.5" disks are more robust, as they feature a hard protective casing, and they are also easier to carry as two or three can fit into a shirt pocket. Currently the cost of 3.5" disks is higher than that of an equivalent 5.25" disk, although the 3.5" drives themselves are cheaper.
As mentioned previously, programs will only be generally available on the 3.5" format. The choice of drive size and format however, may be dictated by other considerations. EXDOS is MS-DOS `file compatible' and so can read and write disks produced on other computers. These computers include the IBM PC and compatibles (which mostly use 5.25" drives) and the Apricot range, RM Nimbus, Atari 520ST and the MSX machines (all of which use 3.5"). If data portability is important to you, it is essential to choose drives that can handle the size and format of the disks from the other computer.
Maximum flexibility for the interchange of data with other computers could be achieved by having one 3.5" drive and one 5.25", both of which were double sided, 80 track. This combination would even allow data to be transferred from an IBM PC to an Apricot or vice versa via the Enterprise while still maintaining access to the generally available Enterprise programs.
It should be stressed that we are talking about transferring data to and from these computers, NOT running programs from them.
Although twin drives will make your system more efficient, many of the advantages of a disk system can be obtained with a single disk drive. EXDOS features an automatic MAPDISK mode which prompts a single drive user to change disks when required. This is more fully explained in Appendix C at the back of this manual.
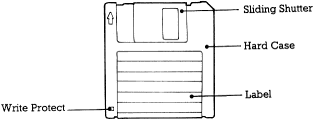
Diagram 1. - The 3.5" floppy disk.
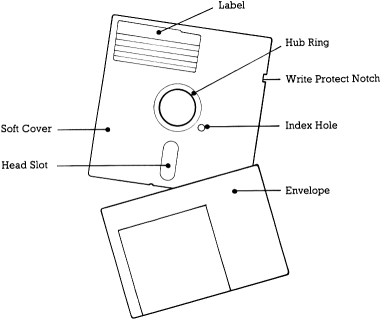
Diagram 2. - The 5.25" floppy disk.
CHAPTER 3. - WHAT IS A FLOPPY DISK?
A floppy disk, like cassette tape, uses a magnetic oxide coating as a storage medium. The tape cassette is a'serial storage' device which requires `winding on' to the appropriate place on the tape before data can be accessed. This procedure can be hit and miss due to the uncertain nature of the tape counters on cassette decks and the length of tape involved. It is also very time consuming due to the slow tape loading speeds.
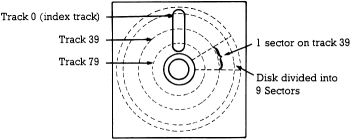
On a floppy disk, the data is usually held radially in tracks across the surface of the disk, with each track divided into a number of sectors. An indication of how the tracks and sectors are layed out on a disk is shown in Diagram 3.
When a new disk is purchased it is totally blank, and does not contain the divisions into tracks and sectors. Before it can be used, it must be FORMATted - this creates the magnetic `reference marks' which divide the disk into tracks and sectors. Instructions on how to FORMAT your disks are given later in this manual.
As we have previously mentioned there are several sizes of floppy disks available. We will only concern ourselves with the 3.5" and 5.25" types. The main features of each type of disk are shown in Diagrams 1 and 2.
Diagram 3. - How data is stored on a floppy disk.
Care of disks.
In order to keep programs and data safe, certain precautions must be taken when handling floppy disks. Here is a list of do's and don't's:
Do not place the disks close to sources of magnetic radiation, these include magnets, monitors, TV's, radios, speakers, tape recorders, telephones and electric motors.
Always store in a cool, dry, dust free place.
Do not touch magnetic surfaces, always store 5.25" disks in their envelopes. Do not slide the protective shutter back on 3.5" disks.
Only write on the labels of 5.25" disks with felt tip pens. Do not bend or fold disks.
Always keep a back-up copy of important data on a separate disk.
Do not insert or remove disks from a drive when they being accessed by the system. Insert disks carefully.
Do not power down the drives or the computer during a disk operation.
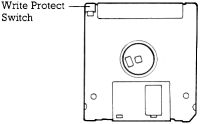
Disks may be 'write protected', to stop any data being written to the disk or any files being deleted. Figures 4 and 5 show how disks may be write protected. Files may also be made `read only' by using the ATTRibute command under IS-DOS. See your IS-DOS manual for further details.
Diagram 4. - Write protecting a 3.5" disk.
Underside
Hole covered = Write enable
Hole uncovered = Write protect
Slide plastic' switch' to change
Diagram 5. - Write protecting a 5.25"
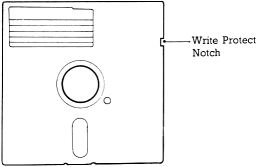
Top
Notch covered = Write protect
Notch uncovered = Write enable
(Cover with sticky tape provided to write protect)
CHAPTER 4. - WHAT IS A DISK OPERATING SYSTEM?
The job of an operating system is to control the standard functions of a computer, and to provide a simple means for programs to work within the computer.
Each Enterprise contains EXOS - the operating system used by ISBASIC and other Enterprise programs. In addition to controlling the computer, EXOS provides special routines for graphics and sound features, and also enables the use of cassette tapes for saving and loading programs or other data.
Each disk interface contains EXDOS - an extension of EXOS which fully integrates the use of floppy disks with normal computer operations. Since disks add a significant extra capability to the computer, the operating system has to be made more powerful to take advantage of this capability.
The principal job of the disk section of the operating system is to control and assist data storage and retrieval To do this, data is split up into units known as `files'.
Each program stored on disk, for example, is contained in a file, and is given a unique `filename'. The program can therefore be loaded from disk by specifying the filename. This operation is identical to loading files from tape.
Files may also contain documents from a word processor, numbers from a spreadsheet, or the image of a graphics screen - any data can be stored in a file.
Most EXDOS operations are connected with the handling of files, and most occasions when you use EXDOS directly it will be in order to manipulate files.
It is the responsibility of EXDOS to organise files stored on disk. As mentioned in the previous chapter, the magnetic signals on the disk are separated into tracks and sectors. EXDOS uses these sectors to store data, but it is very unlikely that you will ever be concerned with the organisation of the disk at this level.
When using the disk system, you will be concerned with the partitioning of the disk into directories, each one of which can contain a number of files. By this means you will be able to keep a large number of files on one disk, but you will be able to avoid confusion by keeping groups of files in separate directories - like placing real document files in separate drawers of a filing cabinet.
Most operations of the disk operating system will be unseen by you in your use of the the Enterprise computer, but EXDOS also provides a number of extension commands. These can be used from BASIC, or through the use of a special `command interpreter' provided by EXDOS. The command interpreter is a simple way of giving a sequence of extension commands without disturbing your BASIC program or word processor document.
Full details of the facilities of EXDOS, and guidance to its use, are given later in the manual.
CHAPTER 5 - INSTALLING YOUR INTERFACE AND DRIVES.
It is important that this chapter is read carefully before attempting to connect your system. It will also be necessary to refer to your disk drive manual.
Every disk drive connected to the disk interface is given a unique designation, so that you can refer to the drive in a command and the hardware can select the drives individually. The four drives which can be attached to the Enterprise are designated A:, B:, C:, and D: (described by some manufacturers as drives 0, 1, 2 and 3), and a small switch needs to be set inside each disk drive to give it the correct designation.
If you are connecting a single drive, or a `boxed' pair of drives to your system, it is likely that the drives will already have their switches set correctly. Normally a single drive will be configured as drive A: (or drive 0) and a twin drive as A: and B: (or 0 and 1). Please refer to your disk drive manual to confirm this.
If you are adding more drives to your system, or using several single drives (possibly from different manufacturers), then it will be necessary to check your disk drive manuals. Follow instructions in these manuals in order to set the drive selection switches, and also to install if necessary a 'terminating resistor package' on the last drive fitted to your cable.
Your Enterprise interface pack should contain the following items. If any are missing please contact your dealer.
1) Disk interface module.
2) Adaptor unit.
3) This manual.
4) Registration and Warranty card.
The following items will also be required:
5) An Enterprise 64 or 128 computer.
6) Self powered Shugart 410 compatible disk drive(s). See
Appendix B for further details on acceptable disk drives.
7) A supply of suitable floppy disks. Note that disks are of
varying quality depending on the amount of data they are
expected to contain, and whether they are intended for single
or dual side operation.
Your local computer store should be able to offer advice on the choice of drive and disks. If in doubt please contact Enterprise Computers Ltd. or (if outside the UK) their local distributor.
Diagram 6. - The complete system.
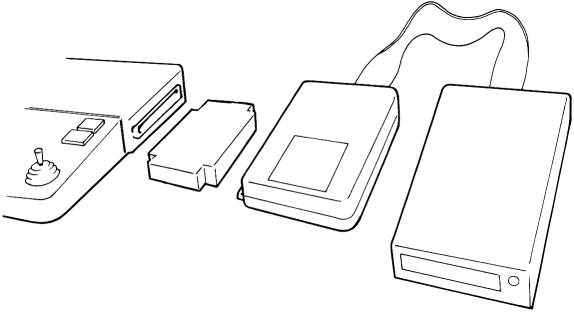
Step by step instructions.
IMPORTANT Please ensure that ALL of your system is disconnected from the mains supply. Disconnect all peripheral cables from your Enterprise.
Refer to Diagram 6 to see the general layout of the connected items.
A) Arrange your computer on the desk or table so that there is sufficient room for the interface and drives on the right hand side of the computer.
B) Connect the ribbon cable from your disk drive(s) to the connector on the rear of the Interface module. The interface connector is polarised to prevent mis-insertion of polarised drive cables.
If your drive cable has an unpolarised connector then ensure that the marker arrow is to the right and top of the cable when looking INTO the interface connector. This will normally mean that the red `tracer' on the ribbon cable is also on the right. If in doubt, please refer to your disk drive manual.
Clip the 'ears' on the interface connector over the ribbon connector to hold it firmly in place.
C) Plug the interface module into the adaptor unit. The ventilation slots on the adaptor unit should be underneath and the auxiliary power socket to the rear.
D) Remove the cover from the expansion port on the right hand side of the Enterprise computer.
E) Carefully plug the adaptor unit / interface module combination into the Enterprise expansion port. Ensure that both computer and interface are fully supported to reduce strain on the connectors.
F) Refer to Diagram 6 to ensure that your system matches that shown.
G) Reconnect your monitor, printer and other peripheral cables. DO NOT connect the power supply at this stage.
Testing the system.
If your drives are labelled 0 and 1, it is best to change these designations to A: and B:. This will avoid confusion when using the system. Remove any 'transportation spacers' from your drives. Keep these safe for re-insertion in case of future transportation of the drives. Connect your drives to the mains supply and switch on.
With the power conector removed from the computer, plug the Enterprise power supply into the mains.
Plug the power connector into the Enterprise computer, the red LED indicator on the computer should come on and the LED indicators on the drive(s) should light briefly (details about these are explained later).
Should the computer indicator fail to light, remove the power connector immediately. Remove all mains supplies and check that all connections are made correctly and that all connectors are pushed fully home. UNDER NO CIRCUMSTANCES CONNECT OR DISCONNECT YOUR DRIVES, INTERFACE AND/OR ADAPTOR UNIT WHILE THE DRIVES OR COMPUTER ARE POWERED UP. If you have problems, please contact your supplying dealer or Enterprise Computers Ltd.
If the system powers up correctly then the following sequence of operations will take place if no disks are present in the drives:
The Enterprise will go through its normal system test.
This will be followed by a check on whether drives are connected. If there is a drive B: its `read' light will come on briefly. The light on drive A: will then come on, and will remain on until a disk is placed in the drive. This will serve as a reminder that the computer is expecting a disk to be placed in the drive, but you may ignore this signal as long as you wish.
The Enterprise will then display its usual 'start up' display, with the flashing E N T E R P R I S E logo.
Pressing any 'normal' key will instigate a further series of events:
The system will now check drive A: to see if a'start-up' file is present (further details on what will happen if one is found are given later).
The system will then enter IS-BASIC (if the cartridge is installed) and display the available bytes on the screen. This will be less than in a tape based system due to the claiming of some memory as EXDOS workspace.
If the computer fails to perform these operations, and does not display a message on the screen, check the connections again as described above, REMEMBERING TO SWITCH OFF THE POWER TO THE COMPUTER AND THE DISK DRIVES FIRST.
Normally any fault with the disk system or disk drives will be ignored by the computer at this stage, but you should observe the disk drives for the following faults:
- With more than one disk drive connected, all the 'read' lights on the drives remain on.
This means that you have probably connected the ribbon cable to the disk drives upside down. Switch off the computer and disk drives, unplug the ribbon cable and reconnect the other way up.
If this does not cure the problem, it is possible that more than one disk drive has been selected with the same drive designation. Consult your disk drive manual on the subject of the drive selection switch.
- No disk has been placed in drive A:, but the read light of this drive is not lit.
This could mean that you have forgotten to switch on the disk drive. Turn on the power to the disk drive, and give two quick presses to the red reset button on the back of the Enterprise to start a 'cold reset'.
The next stage of testing the installation of the disk system is to type:
:help [ENTER]
on the Enterprise.
If everything is functioning normally, the following message will appear
EXDOS version x.x
BASIC version x.x
WP version x. x
where x. x are the version numbers of the installed firmware.
If the message displayed does not include the word EXDOS, then the disk interface unit is not functioning properly. If this is the case, recheck the connections, TURNING OFF POWER FIRST.
This concludes the initial testing of the disk interface unit. Even if no disk drives are connected to the interface unit, it is possible to go through this installation procedure, and EXDOS gives you a range of commands which are useful even without disk drives.
In fact the Enterprise can be operated as if it is a disk-based computer, with no disk drives attached at all, through the use of the EXDOS RAMDISK feature. More about this later in the manual.
Giving commands to EXDOS
If we now type:
:help exdos [ENTER]
this will result in the copyright message being displayed, followed by a list of EXDOS commands. An explanation of the functions and use of these commands is given in the command reference section of this manual (chapter 8).
NOTE EXDOS commands may be entered in upper or lower case letters. When using commands from the BASIC editor screen, they must be preceded by a colon (:). The use of EXDOS commands from within a BASIC program and from the word processor are described later in this manual.
Before carrying out some simple disk operations, we will take a brief look at the EXDOS 'command interpreter'. This has its own 20 line x 38 column screen and is called by typing:
:exdos [ENTER]
You will note that the top twenty lines of the screen have now cleared and changed colour. Also the message on the status line has changed to:
EXDOS command interpreter
EXDOS commands, and any other computer EXTension commands (such as HELP) can now be directly entered and executed (no colon required). BASIC may now be re-entered by typing:
basic [ENTER]
It is also possible to re-enter BASIC by pressing the ESC key, and in this case any BASIC program that was previously in memory will still be preserved. To use BASIC again, with a clear screen, press Fkey 5 (TEXT); alternatively, to return to the previous editing screen of BASIC, press SHIFT and Fkey 5 (DISPLAY TEXT).
The final test of the system is to carry out some simple disk operations.
CHAPTER 6 - FORMATTING AND USING A DISK
As we have mentioned previously, before a new disk can be used it must be formatted to suit the system in which it will be working. The FORMAT command should be used with care as formatting a disk containing data will irretrievably destroy that data EXDOS always gives a warning message and asks for confirmation before formatting a disk.
EXDOS automatically formats the disk to the maximum capacity of the disk drive used (ie. 40 or 80 track and single or double sided). It is also possible to format a disk for a`lesser' drive (i.e. 40 track on an 80 track drive and/or single sided on a double sided drive). Further information on use of these special options is given under the heading FORMAT in the command reference section,of this guide.
To format a disk to the default settings, the procedure is as follows:
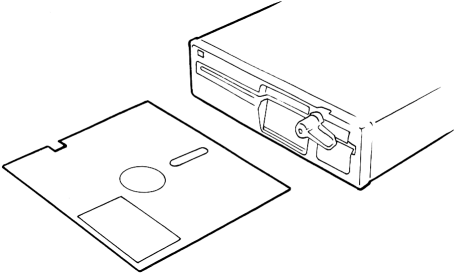
Insert a new disk into the required drive (see Figures 7 or 8 for disk insertion) and close the drive doors (if fitted).
Diagram 7. - Inserting a 3.5" disk.
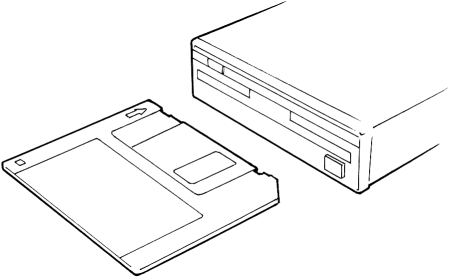
Diagram 8. - Inserting a 5.25" disk.
Enter the EXDOS command interpreter (see previous chapter).
Type:
FORMAT x: [ENTER]
where x is the drive containing the disk to be formatted. Valid drives are A: through D: depending on the number of drives fitted, with E: being reserved for RAMDISK (see command reference section). When the FORMAT command has been entered, the message:
Destroy data on drive x: (Y/N)?
If a Y (YES) response is given followed by an [ENTER], the disk is formatted. An N (NO) response will result in the operation being cancelled.
ALWAYS USE THE FORMAT COMMAND WITH CAUTION!
The disk will take approximately three minutes to format, if it is a full capacity (80 track, double sided) drive. You will probably be able to hear the `stepping' operations of the drive, as the disk is formatted.
Once the disk is formatted, it is ready for use. Try using a DIRectory command. Type:
DIR [ENTER]
and the following should appear:
Volume in drive x: has no name
Directory of x: \
*** File not found
The DIRectory command gives the contents of the current directory, but in this case no files exist as the disk is freshly formatted. More information is given on the use of directories and sub-directories later in this manual.
SAVEing and LOADing files.
With the disk interface connected, the disk system becomes the 'default' filing system. This means that BASIC and word processor commands such as LOAD and SAVE automatically use the disk system. As an example we will try saving a small BASIC program. To save and load BASIC programs we must be on the BASIC editor screen, not in the EXDOS command interpreter.
To enter BASIC from EXDOS we type:
basic [ENTER]
First we will type in this small BASIC program:
100 program "DISXTEST. BAS"
110 for x=1 to 10
120 print x
130 next x
Now SAVE this program as if you were using a tape based system. If no file name is specified then the default file name given in line 100 will be used.
The suffix '. BAS' is a file name extension to show that this is a BASIC program. The extension need not be used but it does simplify the recognition of files in a directory. Similarly a `. WP' suffix might be used for word processor files. There is no need to stick to these conventions, you can invent your own suffixes to suit the files you are creating.
The rules for filenames are slightly different when using a disk system instead of tape. When specifying file names for tape operations, they can be up to 28 characters long. When specifying filenames for disk operations, the main name can be up to 8 characters long, with the optional extension up to 3 characters long. Also certain characters have a special meaning to the disk system. This is explained in detail in the command reference section.
Although the extensions are not obligatory, they do become part of the file name and so MUST be specified when attempting to load a particular file.
If we now try our DIRectory command, from BASIC:
:dir [ENTER]
we will get the volume and directory information as shown previously followed by:
DISKTEST.BAS 91 00-00-80 03:4a
91 bytes in one file xxxK free
The figures following the file name represent the length of the file in bytes and the 'date/time stamp' showing when the file was created. This latter information requires the system time and date to have been set correctly on power up - more of that later.
The figure 'xxx' showing the number of bytes free will vary depending on the capacity of the disks you are using.
To load the above program we type:
load "DISKTEST.BAS" [ENTER]
just as if we were using a tape system. Try loading without specifying the file name extension and see what happens. Remember, we can only load BASIC programs from within BASIC, so try typing:
load DISKTEST.BAS [ENTER]
frc a the EXDOS screen and see what happens. While in EXDOS, file names should not be enclosed in quotes.
You will have noticed (if you have more than one drive) that all disk operations o far have operated on drive A:, this is because drive A: is the 'default' drive. To SAVE a file to drive B: we must specify:
save "B:DISFTEST.BAS"
and the full filename must be included after the specified drive. Similarly to LOAD a file from drive B: we type:
load "B:DISKTEST.BAS" [ENTER]
While a DIRectory of B: would require the command:
:dir B: [ENTER]
to be entered from BASIC (dir B: from EXDOS).
It is also possible to change the default or 'logged' drive. This is done by typing:
:B: [ENTER]
OR
B: [ENTER]
depending on whether you are in BASIC or in EXDOS.
Using EXDOS from within BASIC programs.
It is not possible to use a colon to specify an EXDOS command from within a BASIC program In order to pass a command to EXDOS, or any other system extension, we must use the EXT function.
The EXT function requires the commands and parameters to be passed to be included in a'string', no preceding colon is required. Let us try the following small program, which assumes that you have a disk containing files in drive A:
100 program "EXT_TEST.BAS"
110 ext "dir a:"
Having typed in this program, RUN it and see what happens. You will find that a DIRectory of the disk in drive A: is displayed on the screen.
Try using some other EXDOS commands (not FORMAT!) from within a BASIC program to get used to the EXT function. But note that when using BASIC versions 2.0 and 2.1 it is necessary to do a GOTO following an EXT command, so that BASIC is correctly reinitialised when returning from a system extension. For example, the program above could be re-written as:
100 program "EXT_TEST.BAS"
110 ext "dir a:"
120 goto 130
130 print "That was a directory of drive A:"
Refer to the reference section of this manual to see what all the EXDOS commands will do.
Using the tape filing system
Although the disk is now the default filing system, this does not mean that files cannot be SAVEd and LOADed from tape. To load a program from tape we can type:
LOAD "tape:" [ENTER]
and, similarly, to save a program on tape we would type:
SAVE "tape:filename" [ENTER]
It is also possible to COPY from one filing system to the other. Refer to the command reference section for details. NOTE - Protected files cannot be copied.
Disks and the word processor.
SAVE and LOAD operations on word processor files behave in the same way as on the tape system.
It is possible to pass commands to EXDOS and to enter the command screen from the word processor. Let us try some examples. First we must enter word processor mode.
Type:
:wp [ENTER]
from BASIC or use shifted Fkey 8 followed by [ENTER].
Type some text on the screen or load up a previously saved file. Remember to use 'tape:' before the filename if loading from cassette.
In order to enter the EXDOS command screen from the word processor, we must first press Fkey 8 (EXIT). When the message:
Press ENTER to enter BASIC
appears, DO NOT press [ENTER] but type
:exdos [ENTER]
and the EXDOS command screen will appear. Commands can now be entered in the normal way. Try the DIRectory command, and you will see that the directory appears on the command screen. To return to the word processor screen, press the ESCape key, and you will find that your text is intact.
It is also possible to execute an EXDOS command without entering the command screen. In this case, however, the results will appear IN the word processor text. Try pressing Fkey 8 (EXIT) again, but, this time type:
dir [ENTER]
when the message appears. You will notice that the directory is now included within your text.
When using the word processor to create files for use by other programs, or to operate as batch files (see appendix E), you will find it most convenient to use the PRINT function of the word processor.
With your text on the word processor screen, press Fkey 3 (PRINT) and the following prompt will appear.
Press ENTER for parallel printer,
or type device-name:
When you see this prompt, give a filename and then press [ENTER]. Your word processor text will be saved on disk, under the filename specified, in 'ASCII' format. This format will allow the text to be used by other programs, or by the TYPE command (see the reference section).
CHAPTER 7. - MANAGING FILES ON DISK
The primary purpose of a disk system is to save and load data. Because of the speed and random access facility of disk systems, it is possible to save and load data automatically under control of a program without causing significant interruption to the user of the program.
The result of all this is that disk drives attached to computers are used very heavily, and the disks soon fill up with files. It is a maxim that the capacity of a disk, like the RAM in a computer, is never sufficient. Files will fill whatever space is available.
To maintain control and usability of all these files requires considerable organisation. The operating system handles most of this automatically, but there are times when only the user of the computer knows what is wanted.
Disk organisation
The first stage in managing files is to label the disks. All fresh disks come with blank label. and so the disks can be marked with a suitable description of their contents. Different disks can be kept for different purposes.
The equivalent operation in EXDOS is to give the disk a'volume' name. From the EXDOS command interpreter, with drive A: as the default, and your testing disk in the drive, type:
vol Test Disk [ENTER]
Next type:
dir [ENTER]
At the head of the directory listing, there will now be the line:
Volume in drive A: is Test Disk
and the disk now has an encoded 'label'. The volume name can be up to eleven characters long, and unlike filenames can include spaces.
However, one disk can easily contain more than fifty files, and the number could in theory be more than five hundred! One label for the whole disk is hardly sufficient when the disk contains a large number of files.
To overcome this problem, the disk can be partitioned off into separate directories. These disk areas are called directories because one finds out about a file by looking up its details in a directory, just as one might look up a telephone number in a suitable directory for the area.
EXDOS organises its directories in a 'hierarchical' fashion. This means that a directory may itself be found within a directory, and may itself contain other sub-directories.
If one considers a postal address, it is possible to see that this works in an identical hierarchical fashion. For example, consider the address:
Enterprise Computers Ltd
31 Hoxton Street
London N1
England
The hierarchy of the address can be seen from the bottom upwards, and the final location is found by deductive means.
First the location of Enterprise Computers Ltd is seen to be in England. This narrows the area of search. The next step is to concentrate on London N1, and finally to 31 Hoxton Street. This process could be carried on further, to specify a particular individual at Enterprise Computers.
Now try this process on your computer. In EXDOS command mode, as above, type:
md England [ENTER]
MD is the shorter version of the command MKDIR, which 'makes' a directory.
Now type:
md England\London.N1 [ENTER]
Notice that the names of directories follow the same rules as for files, and we have given the '.N1' as the filename suffix. Notice also the use of the backslash character "\" - this is the dig iding line between levels of the directory, just as a complete new line is used when specifying a postal address.
Now type:
md England\London.N1\31Hoxton [ENTER]
Remember that the Enterprise screen editor can be used in these examples, to avoid having to re-type the line for each command.
Using the screen editor again, enter the line:
cd England\London.Nl\31Hoxton [ENTER]
CD is the shorter version of the command CHDIR, which 'changes' the current directory.
Now type:
dir [ENTER]
EXDOS will respond with:
Volume in drive A: is Test Disk
Directory of A:\ENGLAND\LONDON.Nl\
31HOXTON
*** File not found
Now type:
wp [ENTER]
to enter the word processor, and then create a document. For example, type:
The home of the Enterprise computer
Press Fkey 2 [SAVE] and, in response to the prompt for a filename, type:
ECL [ENTER]
You have now created a file with the 'address':
\ENGLAND\LONDON.Nl\31HOXTON\ECL
In the jargon of disk systems, this is known as a filename path. Notice that the first character in the path is a backslash - this signifies that the path starts from the original directory of the disk, known as the `root' directory. If this backslash is not given, the path starts from the current directory.
For each disk on line to EXDOS there is a current directory. This is the default directory, in the same way that there is a default disk drive, so if no disk drive or directory path is specified in an EXDOS command, it uses the current directory on the default drive. Whenever a new disk is used, the current directory is set to the root directory of that disk.
Housekeeping
Assuming that the files on disk are well organised, it is still necessary to perform `housekeeping' operations, such as copying, deleting, renaming, and moving files.
The EXDOS command which you will possibly use most often, after DIR, is COPY. Disks are not 100% reliable, even though a single disk will probably perform millions of operations before it fails, and an indispensible process when using disks is to make back-up copies of files in case the originals are lost. COPY is also used when duplicating files onto different disks, and so for transfer of data to other computers.
A COPY command can be used to transfer a single file at a time. For example, to make a back-up copy of the file 'ECL' created earlier, one could type:
copy ecl ecl.bak [ENTER]
This copies the contents of 'ECL' into a file named 'ECL.BAK'. File 'ECL' would remain unchanged.
It is also possible to specify several files with a single command. For example:
copy a:*.bas b:
would copy all files in the current directory of A: which have the suffix'.BAS' (perhaps BASIC programs) into the current directory of B:. Since no filenames were specified for B:, the copies created would have the same filenames.
The '*' character is known as a ' wildcard', and it signifies a match with any number of characters in the filename or filename suffix (which are considered separately when making the match).
Most commands can be used with such wildcard operations, giving an ' ambiguous filename'. For example, the command:
dir [ENTER]
is really the command:
dir *.* [ENTER]
since '*.*' is taken as the default parameter to the command DIR.
One could type:
dir *.bas [ENTER]
for a directory listing of all files in the current directory which have the suffix '.BAS'.
The other wildcard character is `?', which is used as an ambiguous specification for one character of a filename. For example:
dir test.ba? [ENTER]
might produce a directory listing containing the files 'TEST. BAS' and 'TEST.BAT'.
For a detailed description of the disk houskeeping commands, refer to the next chapter - the command reference section.
CHAPTER 8. - COMMAND REFERENCE SECTION.
The command reference section uses the following notation to specify and describe the operation of commands:
Words in upper case
These are keywords and must be entered as shown in any mixture of upper or lower case.
Items in lower case
These are parameters which must be supplied to the command at this point in the command line.
Items in square bracket ('[' and']')
These are optional items. The brackets themselves should not be included in the command line.
Items separated by a vertical bar ('')
This indicates that one but not both of the items is required. The vertical bar itself should not be included in the command line.
The following is a list of items which can appear on a command line:
d:
This indicates that a drive name is required (A:, B: etc.). If not given, then the default of the current logged-on drive is specified.
Valid filename designators are A:.... Z:, although only drives A:, B:, C: and D: are supported by the standard disk interface hardware, with drive E: reserved for the standard RAMDISK.
path
This indicates that a directory path is required, each directory name being separated by a backslash `\'. A backslash at the start of the path indicates that the path starts at the root directory, otherwise the path starts at the current directory.
Two consecutive dots '..' signify the immediate parent directory in the path. A single dot '.' signifies the current directory in the path, and therefore has no value in a path specification. In both cases backslashes must be used to indicate that the dots refer to a directory.
For compatibility with Enterprise keyboards which do not support the '\' character, a '!' character may be used in its place when specifying a path.
The syntax of directory names follows that for filnames, given below.
filename
This indicates that the name of a file is required. An ambiguous filename is one that contains '*' and '?' characters and may match more that one file on disk whilst one that does not contain these is an unambiguous filename.
A filename has the following syntax:
filespec.suf
where filespec is a sequence of up to eight characters, and suf is a suffix of up to three characters. If the suffix is given, it must be separated from the filespec by a single dot '.'. The following characters cannot be used in the filespec or suffix:
Control codes and SPACE (in range OOh-20h)
: ; . , = + < > \ / " [ ] Ł !
Normal alpha characters are turned into upper case by EXDOS, and therefore lower and upper case characters have the same meaning.
Frequently a filename follows a path, in which case the two must be separated by a backslash.
volname
This indicates that a volume name should be given. A volume name is a sequence of up to eleven characters, which can include the characters not valid for filenames, with the exception of control codes and '/' (although leading spaces will be deleted).
channel
This indicates that an EXOS channel number is required. The channel is assumed to be open, and thus this option on commands is provided for use with an application program that has already opened the channel If the channel is not open, then the commands which can take a channel number generally can also take a device: filename (see below) in which case a channel is opened at the start of the command and closed again at the end.
device: filename
This indicates that a string suitable for an EXOS open/create channel call is required: ie. an optional device and optional unit number and colon, followed by an optional filename, at least one of which must be given. A channel is opened to this device/filename as described above.
General rules
The parameters of a command must be separated from the command itself by at least one space or tab character (these two characters generally being equivalent to the command interpreter). Where two filenames are required as parameters, they too must be separated by a space or tab. Options given after a filename (after a `/' character) need not be separated in this way.
Although not a command as such, the currently logged-on drive can be changed by giving the command:
d:
which cause drive d: to become the currently logged-on drive, even if it does not actually exist.
In the command examples, underlined text is an example response to a command, and the other text consists of the example commands, with comments that are not part of the command in parenthesis ('(' and ')').
Commands
CHDIR
Format
CHDIR [d:][path]
or
CD [d:][path]
Purpose
Displays or changes the current directory.
Use
If no path is specified, then the current directory path for the default or specified drive is printed. This is the directory path from the root directory to the current directory.
If a path is specified, then the current directory for the default or specified drive is changed to the directory specified by the path.
The CD command is an abbreviated form of the CHDIR command, provided for convenience and MS-DOS compatibility.
Examples
:CHDIR\BOOTRAM\DISK
:CHDIR A:UTIL
:CD
E:\BOOT\RAMDISK
CHDIR A:
A:\UTIL
CLS
Format
CLS
Purpose
Clears the screen.
Use
CLS sends an ASCII control Z to the default channel. Since this is usually an editor channel, this will have the effect of clearing the screen. The main use of this command is in the EXDOS interactive mode or in an EXDOS batch file.
Note that in other circumstances, this command should be used with care since it could, for example, delete all the text if used from the WP.
Examples
CLS
COPY
Format
COPY source [/A][/H][dest[/A][/T]]
Purpose
Copies data from a file, device or channel to another file, device or channel.
Use
source consists of [d:] [path] [filename] (where at least one of the three options must be given) or device/ filename or channel. If the first form is given, then the specified files are copied, which may include hidden files if the/H option is given. If a channel number is given then data is copied from the channel. If a device/filename is given, then a channel is opened to the device, data is read from the channel and the channel is closed at the end of the operation. The drive and path default to the current drive and path, and the filename defaults to *.*.
Similarly dest can be a file on disk, a channel or a device/filename, and is similar to the source except that data is written to a channel or device instead of being read from it and if a device/filename is specified then an EXOS `create' call is made instead of an `open'. If a filename is not given for dest, and source is a device/filename or channel, then an error is returned. If, however, the source is a filename, then the dest filename defaults to the filename of the file that matched the source filename.
The /A option controls whether the data being copied is to be treated as ASCII or binary, as described below.
On the source, /A means that all data up to and including the first control Z or until the end of file will be read, although the control Z will not be copied. If /A is not given, then all data will be read from the source until the end of file is read. Note that many EXOS devices will never return end of file (such as the SERIAL: device) and so should only generally be used with the /A option.
On the dest, /A means that all data up to but not including the first control Z will be written, and then a single control Z will be appended to the data written. If /A is not given, then all the data will be written and nothing will be added.
If an ambiguous filename is given on the source, then the filenames will be displayed as they are copied. If an error occurs during the copy or if the STOP key is pressed, then all necessary files and channels will be closed and the error returned.
When copying from more than one file to a channel, then all the data from the files will be sent to the channel sequentially, with a control Z between each file if appropriate. When copying from more than one file to a device/filename, then a new channel will be created and closed to the device for each file copied. Thus, for example, copying multiple files to TAPE: will work.
When copying from one file to another, the attributes are not affected, and the destination file is given the same attributes as the old. Similarly, the destination file is given the same date and time values as the source, although if the /T option is given then the new file is given the current date and time instead.
The speed of operation of the copy depends upon the type of data transfer and the amount of available memory. When a disk file is the source, the copy command block reads as much data as it can into as much memory as it can allocate (up to a limit of 64K) before writing it out to the destination. If the source is a channel or a device/filename, then the data is block read 64 bytes at a time into up to 64K of memory, unless a /A is given on the source or the destination is also a channel or device/filename, in which case the copy takes place by reading one byte at a time from the source and writing one byte a time to the destination.
If the destination is a disk file, then it will be deleted if any error occurs (including the 'STOP' key being pressed) during the copy operation. Thus it will not normally be possible to have partially copied files on disk.
It is, however, possible to copy a file to disk by copying through the EXDOS EXOS disk device. In this case, the channel will be closed but the file not deleted if an error occurs. Thus if a binary copy is done from the serial device to the disk device, then pressing the 'STOP' key will result in the disk file containing all the data that has currently been copied.
Examples
:COPY FRED B:
:COPY A:\BOOT\EXDOS.INI B:
:COPY A:\BOOT B:\BOOT
:COPY E:BOOT TAPE:
:COPY Ł3 FRED
:COPY B:
:COPY TAPE: DISK-2:TAPEFILE
DATE
Format
DATE [date]
Purpose
Displays or sets the current date.
Use
If the date is given after the command, then the date is set to this value (for the format see below). If the date is not given after the command, then the current date is printed and the new date is prompted for and input. If no input is given (ie. if the [ENTER] key alone is pressed) then the current date is not altered. Otherwise the input is assumed to be a new date, and is interpreted as described below. If the date is invalid then an error message is displayed and the new date again prompted for and input.
The format of the date is flexible, and is specified by the EXOS variable DTFORM, described in Appendix F. This variable allows the date to be printed and input in the form of the UK format (DD-MM-YY), the American format (MM-DD-YY), the International format (YY-MM-DD) or indeed any other format. When inputting, the separators may be ',', '-', '.', '/', ':' or space, with spaces either side of the separator. Leading zeros on the date numbers are not significant. Any missing fields will default to the current value.
Examples
:DATE 12-7-85
:DATE
Current date is 12-7-85
Enter new date: 12-8
VAR 79, 57
:DATE 85/2/1
DEL
See ERASE.
DIR
Format
DIR [d:][path][filename][/H][/W]
Purpose
Displays the names of files on disk.
Use
The drive, path and ambiguous filename specify which files are to be listed. If the /H option is given, then hidden files will also be listed.
There are two formats of the listing. If the /W option is given, then a'wide' listing is printed, with six filenames output per line. The output format is such that in 40 column mode the line will be split in a suitable place to show three filenames per line. Sub-directory names, file attributes, and the date and time each file was created are not displayed.
If the /W option is not given, then the filenames are printed with one filename per line, together with the attributes, the file size and the date and time of creation. The display of this is designed to fit within 38 characters, thus avoiding word wrap on an editor channel with a 40 column video display. At the bottom of this display is the total number of files listed, the total number of bytes in the files listed and the remaining free bytes on the disk.
Examples
:DIR
:DIR B:/W
:DIR A:\BOOT
:DIR A:BOOT\EXDOS.INI/H
:DIR E:*.COM
ECHO
Format
ECHO [text]
Purpose
Prints text (comments, instructions etc.) in an EXDOS batch file.
Use
The text is simply printed to the normal EXDOS command interpreter output channel If no text is given, then just a blank line is output.
Examples
:ECHO Now enter new date and time
:ECHO
ERA
See ERASE.
ERASE
Format
ERASE [d:][path][filename][/H]
Purpose
Deletes all files which match the path/filename.
Use
At least one of the first three optional parameters must be given. If the filename is ambiguous, then more than one file may be deleted. If no filename is given, then the filename defaults to *.*, indicating that all files in the current or specified directory are to be deleted.
If the /H option is given, then hidden files may also be deleted.
If any of the files specified have been marked as read only, then these files will not be deleted and the delete operation will continue. An error will be returned if no files were deleted.
If the filename is *.*, then the prompt:
Erase all files (Y/N)?
is printed, and a reply is waited for. If the reply is anything other than 'Y' or 'y, then the file deletion does not take place. This is a safety feature designed to prevent accidental loss of all files in a directory.
Examples
:ERASE TEST.BAK
:DEL *.COM/H
:DEL B:\BOOT\EXDOS.INI
:DEL B:\BOOT
Erase all files (Y/N)?
EXDOS
Format
EXDOS [device:filename channel)]
Purpose
To initialise the EXDOS system and run simple batch files.
Use
The EXDOS command reads EXOS extension commands ('colon' commands) and executes them, with it's own private video, editor and keyboard channels.
If a device/filename is specified, then a channel is opened to the device and closed again after the operation (default filename is EXDOS.INI). In this case, or if a channel is specified, then commands are read from the channel and executed. The commands may include any extension commands implemented by EXOS system extensions. Any error messages or text produced by the commands will appear on a video/ editor page, which will be closed when the EXDOS command terminates.
If no device or channel are specified, then EXDOS enters an 'interactive mode'. In this mode, a prompt is printed (':') and commands are read from the editor.
Upon reading an end of file, control Z or the 'ESC' being pressed (in 'interactive' mode), the EXDOS command terminates, closing all channels it may have opened and restoring all EXOS variables it may have changed. See Appendix E for more details.
Examples
:EXDOS B:
:EXDOS EXDOS.INI
:EXDOS Ł10
:EXDOS
FORMAT
Format
FORMAT [d:][volname][/1][/H][/8]
Purpose
Formats a disk
Use
The drive formatted is the default or specified drive. The volname (if given) is the volume name that will be given to the disk.
The /1 option (if given) causes the disk to be formatted as a single sided disk (default double sided), the /H option (if given) causes the disk to be formatted with 40 tracks per side in an 80 track drive (default 80 tracks) and the /8 option causes the disk to be formatted with 8 sectors per track (default 9).
Disks in a single sided drive will always be formatted as single sided disks, and disks in a 40 track drive will always be formatted as 40 track disks.
Before formatting starts, a press of the `Y' key is prompted for as a safety feature.
Examples
FORMAT B:
Destroy data on drive B: (Y/N)?
FORMAT B:SOURCE/1/h/8
ISDOS
Format
ISDOS [d:][/command]
Purpose
Boots IS-DOS from disk.
Use
If the drive is given, then IS-DOS is loaded and run from the system file on the specified drive, which then becomes the `booting' drive. If no drive is specified, then IS-DOS is booted from the current booting drive, or the currently logged on drive initially. The command (if given) is passed to IS-DOS (without the / character) which then interprets it as though it had been typed in at the IS-DOS prompt. Normally, the command, if given, will be the name of a file which will be loaded and executed, although it could be any other valid IS-DOS or EXDOS command. If the command is not given, then IS-DOS will look for and execute a file called AUTOEXEC.BAT.
Examples
:ISDOS
:ISDOS B:
:ISDOS A:/C:MYPROG
LOAD
Format
LOAD device:filename | channel
Purpose
Loads an EXOS module via EXOS.
Use
If a device/filename is specified, then a channel is opened to the device and closed again at the end of the operation. The EXOS module is read from the channel, and more than one module may be loaded.
Examples
:LOAD FORTH
:LOAD Ł10
MKDIR
Format
MKDIR [d:]path
or
MD [d:]path
Purpose
Creates a new sub-directory.
Use
The last item in the path is the name of the new sub-directory which is to be created on the default or specified drive. Thus if this is the only item in the path string, the new directory is created in the current directory. If the new directory is to be hidden, then it must be separately made hidden with the ATDIR command of IS-DOS.
The MD command is an abbreviated form of the MKDIR command provided for convenience and MS-DOS compatibility.
Examples
:MKDIR UTIL
:MKDIR A:\BOOT\RAMDISK
MOVE
Format
MOVE [d:][path][filename][/H][d:][path]
Purpose
Moves files from one directory to another on a disk.
Use
At least one of the first three optional parameters specify the files which are to be moved to the directory specified by the second drive and path. The filename if not given defaults to *.*. If the second drive is given then it must refer to the same drive as the first drive.
If the /H option is given, then hidden files may be included in the move.
If an attempt is made to move a file into a directory which already contains a file of the same name, then the move operation stops and an error is returned.
Examples
:MOVE FRED\
:MOVE E:*.INI/H E:\BOOT
:MOVE \UTIL
MVDIR
Format
MVDIR [d:][path][/H][d:][path]
Purpose
Moves sub-directories from one directory to another on a disk.
Use
The last item in the first path specifies one or more directories which are to be moved on the default or specified drive to the directory specified by the second path. If the second drive is specified then it must refer to the same drive as the first. The move operation is stopped and an error returned if an attempt is made to move a directory into another directory which already contains a sub-directory of the same name, or if an attempt is made to move a directory into one it's own descendants, since this would violate the tree structure of sub-directories.
Examples
:MVDIR COM UTIL
:MVDIR E:INI?/H E:\BOOT
:MVDIR \RAM
PAUSE
Format
PAUSE [text]
Purpose
Prints text and prompts for a keypress in an EXDOS batch file.
Use
The text is printed to the normal EXDOS CLI output charnel. If no text is printed then just a blank line is output. The prompt 'Press ENTER to continue...' is then printed, and a line is input. Assuming the EXDOS command interpreter input channel is an editor channel, the joystick may be used for scrolling the screen back and forth at this point before ENTER is pressed.
Examples
:PAUSE Insert text disk in drive B:
Insert text disk in drive B:
Press ENTER to continue...
RAMDISK
Format
RAMDISK [number][/D]
Purpose
Creates or destroys the RAM disk.
Use
At least one of the parameters must be given, and the number (if given) must be non-zero.
The specified number of 16K RAM segments will be allocated and set up as the RAM disk, which can be accessed as drive E:. If an attempt is made to create a RAM disk when one already exists, then an error will be returned unless the /D option is also given, in which case any existing RAM disk (and the files on the RAM disk) will be deleted first.
If the /D option is given without the number, then any existing RAM disk will be destroyed, the memory being freed for use by something else.
It is recommended that if the RAM disk is to be set up in the EXDOS. INI initialisation file then the /D option is given with the command. It is then possible to execute the EXDOS. INI file at some point in time after booting up.
Examples
:RAMDISK 5
:RAMDISK 10/D
REM
Format
REM [characters]
Purpose
Allows comments to be put in an EXDOS batch file.
Use
All characters on the line after the REM command are ignored, allowing comments in an EXDOS batch file.
Examples
:REM Set up RAM disk
RENAME
Format
RENAME [d:][path][filename][/H][d:]filename
or
REN [d:][path][filename][/H][d:]filename
Purpose
Renames one or more files.
Use
The first drive, path and ambiguous filename specify one or more files which are to be renamed, and either the path or the filename must be given, the filename defaulting to *.*. The second drive must be the same as the first or not given. The second ambiguous filename specifies the new name for the files. A'T in the new name indicates that one character will be copied from the old name into the new name at the position of the '?' (a'*' just being a series of '?')
If the new filename for any of the files being renamed already exists, or is an invalid filename, then the rename operation stops and an error is returned.
If the/H option is specified, then hidden files may also be renamed.
Examples
:RENAME START EXDOS.INI
:REN B:\SOURCE\*.MAC/H B:*.OLD
RMDIR
Format
RMDIR [d:]path[/H]
or
RD [d:]path[/H]
Purpose
Removes one or more sub-directories.
Use
If the /H option is given, then hidden directories may also be removed.
The last item in the path is the (possibly ambiguous) name of one or more sub-directories to be removed from the default or specified drive. If any of the directories to be deleted are not empty, then an error will be returned and the command terminated.
Examples
:RMDIR UTIL
:RMDIR A:\BOOT\FRED?/H
RNDIR
Format
RNDIR [d:]path[/H][d:]filename
Purpose
Renames one or more sub-directories.
Use
If the /H option is given, then hidden directories may be renamed.
The last item in path specifies one or more subdirectories on the default or specified drive (the first drive specification) which are to be renamed. The second drive must be the same as the first or not given. The file name specifies the new name for the directories and may be ambiguous. A '?' in the filename indicates that one character is to be copied from the original name to the new name in the position of the '?' ('*' being a series of '?').
If the new name for any of the sub-directories being renamed already exists, or is an invalid filename, then the rename operation stops and an error is returned.
Examples
:RNDIR UTIL COM
:RNDIR A:\SOURCE\FRED?/H BILL?
TIME
Format
TIME [time]
Purpose
Displays or sets the current time.
Use
If the time is given after the command, then the time is set to this value (for the format see below). If the time is not given after the command, then the current time is printed and the new time is prompted for and input. If no input is given (ie. if the `ENTER' key alone is pressed) then the current time is not altered. Otherwise the input is assumed to be a new time, and is interpreted as described below. If the time is invalid then an error message is diplayed and the new time again prompted for and input.
The format of the time when displayed is HH:MM, and the EXOS variable DTFORM determines whether the time is in the 12 hour or the 24 hour format. See Appendix F for details. When inputting the time, valid separators are ',', '-', '.', '/', ':' or space, with spaces either side of the separator. Leading zeros on the date numbers are not significant. Any missing fields will default to the current value. The time may be input in 12 hour or 24 hour format. Although seconds are never displayed, they may also be input.
Examples
:TIME 16:45
:TIME
Current time is 10:45a
Enter new time:
:TIME 12:13p
TYPE
Format
TYPE [d:][path]filename[/H] | channel | device
Purpose
Displays data from a file or an EXOS device or channel.
Use
If a device is specified, then a channel is opened to that device and closed at the end of the operation. In this case, or if a channel is specified, then then data is read from the channel or device and displayed.
If a disk file is specified, then the filename specifies the file to be displayed. If the filename is ambiguous, then all the files specified are displayed sequentially, with the filename printed first.
The type command terminates when an end of file, or control Z character is read. The /H option if given indicates that it may be a hidden file that is typed.
Examples
:TYPE MYFILE
:TYPE B:\BOOT\EXDOS. INI/H
:TYPE SERIAL:
:TYPE Ł10
VAR
Format
VAR number [number]|[ON]|[OFF]]
Purpose
To set or display the value of an EXOS variable.
Use
The first number is the EXOS variable which is to be set or displayed. If no other parameters are given, then the current value of the EXOS variable will be displayed.
If the second number is given, then the EXOS variable will be set to the specified number, or to 0 if ON is given and 255 if OFF is given.
This command should be used with great caution, as the use of an incorrect variable number can cause the computer to crash.
The EXOS variable number and the value (or ON or OFF) may be separated by ',', '-', '.', '/', ':' or space, and spaces before and after the separator will be ignored. Leading zeros on the numbers are ignored.
Examples
:VAR 4
0
:VAR 4,10
VAR 26 ON
VOL
Format
VOL [d:][volname]
Purpose
Displays or changes the volume name on a disk.
Use
If no parameters are given, or if only a drive name is given, then the volume name of the current or specified drive is printed. If a volname is given, then the volume name of the default or current drive is changed to the specified volname.
Examples
:VOL B:
Volume in drive B: has no name
:VOL B:BACKUP
APPENDICES
Appendix
B Specifying and configuring disk drives
C Working with a single disk drive
D Working with an Enterprise 64
F Use of EXOS and EXDOS system variables
Appendix A. The 'Shugart 410' socket.
Nearly all 3.5" and 5.25" disk drives provide a socket and interface signals which accord with the industry standard connection, normally known as 'Shugart 410'.
The Enterprise disk interface unit contains a 'Shugart 410' socket for connection to the ribbon cable from your disk drives. This appendix describes the signals on this socket.
Diagram A View looking INTO drive
connector on disk interface module.
![]()
Certain signals (marked *) are optional and need not be supported by the disk drive.
Pin I/O Description
1 O Disk change reset. Active signal resets disk change latch
found on some drives. * This signal may be grounded by some
drives that do not use it.
2 I Disk changed. Output from latch present in some drives,
otherwise open circuit.
4 O In use. Supported by the hardware but not by the EXDOS
software.
6 O Select drive 3. True if drive 3 selected.
8 I Index pulse.
10 O Select drive 0. True if drive 0 selected.
12 O As above, drive 1.
14 O As above, drive 2.
16 O Motor on.
18 O Step direction.
20 O Step pulse.
22 O Write data.
24 O Write gate.
26 1 Track 0.
28 1 Write protect.
30 1 Read data.
32 O Select side 1. True for side 1 selected.
34 1 Ready. Not all drives provide this signal, but its use is
recommended*.
Pins 3,5,7,9,11,13,15,17,19,21,23,25,27,29,31, and 33 are Ground and signal return.
The Enterprise disk interface is designed around the Western Digital 1770 disk controller chip. For further information on the operation of the disk interface signals, please consult the WD1770 data sheet or the Enterprise Technical Manual.
Auxiliary power socket.
This socket is provided on the adaptor unit for use in areas of low mains voltage, usually characterised by distortion of the TV picture. For advice on use, please contact Enterprise Computers Ltd. or their distributors.
Appendix B. Specifying and configuring disk drives
The Enterprise has been designed to be used in conjunction with disk drives utilising the `Shugart 410' interface standard. The following criteria should also be checked when specifying the disk drive.
- The motor must be at 300rpm (+/- 3%) within 1 second of a drive
select being issued.
- The drive must be able to accept step commands within 30ms of being
selected.
- The head must load in less than 50ms after a drive select and/ or
motor-on command.
- The data rates supported are 125 Kbits/sec (FM) and 250 Kbits; sec
(MFM), IBM System 34 format.
- The maximum time to reach the outermost track must be less than 1.3
seconds.
- The drive input signals must be level-sensitive (not
edgetriggered).
- After a issuing a ready signal, the drive must be able to
successfully execute a read or a write instruction within 50ms.
- The standard step rate should be 6ms or less, although it is
possible to work with slower step rates (see below). The slowestű
step rate usable is 30ms.
Drives tested by Enterprise.
The following disk drives have been tested and have worked successfully with the Enterprise disk interface:
3.5" BASF 6162
Epson SMD 100
Epson SMD120
Epson SMD130
Epson SMD140
Sony MPX-026R
Teac FD35B
Teac FD35F
5.25" BASF 6128
Mitsubishi M4853
Shugart SA465
NOTE :- The above are uncased, unpowered drives. Suitable cased and self-powered units are available from several sources including:
Cumana Ltd.,
The Pines Trading Estate,
Broad Street, GUILDFORD,
Surrey, GU3 3BH, England
or their authorised distributors.
Un-powered disk drive units
The Enterprise disk interface unit is only designed to work with self-powered disk drive units. If you have a disk drive without power supply, refer to the manual of this drive for its power supply requirements.
Certain drives designed for use with the Acorn BBC computer are fitted with a DC power connector. The pin connections for this are shown below.
Diagram B Looking INTO power connector
on 'BBC' compatible drives.
Drive selection
As we mentioned in the chapter on connecting your system, it is sometimes necessary to reconfigure a drive. Drives are fitted with internal switches or links to enable them to be set up as drive 0, 1, 2 or 3 (equivalent to A:, B:, etc.), please refer to the manual supplied with your drive. It may also be necessary to remove the terminating resistors from one or more of your drives. If in doubt please contact your supplying dealer or the disk drive manufacturer.
Step rates
If your drives have a step rate slower than 6ms, it will be necessary to give an instruction to the Enterprise to work with this slower step rate, and this instruction will have to be given every time you start up the computer or give it a cold reset.
A simple way to give this instruction to the computer is to include it in the EXDOS. INI start-up file, which is explained in appendix E, but if you do so it is essential that EXDOS. INI is the first file you copy to a fresh disk when it is formatted. This disk should then be put in drive A: whenever you start up the computer.
The instruction for changing the step rate consists of altering an EXDOS variable. This can be done through use of the EXDOS VAR command (see the reference section for further details, and appendix F.
The following step rate commands are possible:
:VAR 73,0 (6ms step rate - default)
:VAR 73,1 (12ms step rate)
:VAR 73,2 (20ms step rate)
:VAR 73,3 (30ms step rate)
The step rate specified applies to all disk drives connected. If the step rate is slower than necessary for a particular drive, it reduces the speed performance of the disk system and can lead to noisier stepping from the drives.
Disk change signal
EXDOS contains sophisticated logic for checking on the change of disks by the user - in order to avoid incorrect disk operations, but acting at minimum inconvenience to the user (for example, there is normally no need to 'tell' the computer that you have changed disks).
The disk checking logic works without special hardware in the disk drives, but some makes of disk drive provide a special signal to indicate that a disk has changed. Use of this signal can increase the speed of the disk checking operations of EXDOS, and therefore improve the performance of the system. Unfortunately, the hardware signals used are not compatible with most drives which do not provide the disk change signal, and therefore these signals do not work if the two types of drive are both connected.
If you are only using disk drives which DO provide the disk change signal (eg Sony MPX-026R), then you should give the following instruction:
VAR 89,off
This will turn on recognition by EXDOS of the signal. You will have to give the instruction after every power up or cold reset of the computer, and so is best placed in your EXDOS. INI file (see appendix E).
Appendix C. Working with a single disk drive
When power is turned on to the computer, or if it is given a cold reset (two quick successive presses on the reset button). EXDOS checks to see if there are two disk drives attached. If it finds drive A:, but does not find drive B:, it will do an automatic MAPDISK operation - so that all program or user references to B: will expect the disk for drive B:, but look for it on drive A:.
This means that owners of single drive systems can use programs or commands as if they have two drives.
Note that EXDOS will not perform an automatic MAPDISK if the power to the disk drives is not turned on when it does the initial check. If power is turned on to drive A:, and there is a drive B: with a separate power supply which is still switched off, then EXDOS will thereafter think that there is no drive B: even when it is later switched on. To correct either of these problems, ensure that power is switched on to both disk drives and then give the computer a cold reset.
EXDOS remembers which disk (logically the A: or B: disk) was last used in the A: drive, and will prompt you to insert a different disk only when necessary.
Usually it will cause no trouble if you decide not to change disk, and simply press [ENTER] when asked for the alternative disk. But if there is a file still `open', and EXDOS is trying to use this file, a 'Wrong disk for file' error will be given.
EXDOS maintains a unique 'volume identifier' for each disk in use, to prevent problems due to reading from or writing to the wrong disk. For this disk checking to work fully, you should use disks which have been formatted on the Enterprise. Disks formatted on other computers (such as the IBM PC or the Apricot) can be used, but the disk checking is not so foolproof.
When copying from one disk to another, the operation will become slower and require more disk changes if there is less free memory in the computer. If you notice a slow down, you should be able to improve the situation by, for example, removing the current BASIC program or deleting the RAMDISK - if either of these are using memory.
When copying a large number of small files, you may find it quicker to copy them temporarily to a RAMDISK, and then copy them from the RAMDISK to the second real disk.
Appendix D. Working with an Enterprise 64.
An Enterprise 64 can be used with the disk interface unit in exactly the same manner as an Enterprise 128, although there will of course be less memory to use for the RAMDISK and other EXDOS features. The advantages of IS-DOS will be best realised with the Enterprise 128.
If you are using an Enterprise 64 with EXOS version 2.0, there are two restrictions you will have on the use of EXDOS:
- You will not be able to use the 'null' filename to load the file
'START' from disk (see appendix E). If you press Fkey 1 [START]
from BASIC, EXDOS will think that you are trying to load a file
from the RAMDISK.
- The wildcard operation of '*' and '?' cannot be used from BASIC or
other programs which use the EXOS 'disk device' (this does not
apply to the EXDOS command interpreter).
Note: Enterprise Computers Ltd. offers an upgrade service for owners of Enterprise 64 computers.
Appendix E. Batch and start-up-files.
EXDOS provides simple handling of batch command files. These batch files are used to automatically issue a sequence of command instructions, and any command which is valid when using the EXDOS command interpreter can also be used in an EXDOS batch file.
One particularly useful application of batch files is to create a startup file, which runs whenever a computer is turned on. This is the basis of the so-called 'turn-key' systems.
EXDOS will recognise a file with the filename EXDOS. INI and will run this on power up. INI files contain a list of EXDOS commands and are produced on the word processor. This file must reside in the 'root' directory.
A simple INI file can be produced as follows:
First press shifted Fkey 8 (TYPE) [ENTER] to enter the word processor, now type in the following, ending each line [ENTER]:
echo "This is a start up message."
date
time
dir
wp
Now press Fkey 3 (PRINT), when the prompt message appears type:
a:\exdos.ini [ENTER]
and the file will be saved in the root directory (specified by \ ) on disk A:.
The batch file created above will cause the system to display the 'echo' message on the EXDOS command screen, followed by prompts for DATE and TIME, the DIRectory is then displayed and the system then calls the word processor. EXDOS command files must always be PRINTed to disk, not SAVEd. A SAVEd file contains hidden control codes which will cause EXDOS to give an error message.
(Note that the word processor may not tell you about a disk error, if this occurs while it thinks it is sending the file to the printer.)
The START file
A START file is usually a file containing a BASIC or machine code program which can be auto RUN by pressing Fkey I (START). This works in a similar way to the tape filing system and no other program should be resident in memory or this will RUN instead.
The START command must be given from the BASIC editor screen, not from EXDOS. A START file is produced by giving the program you wish to run the file name `START'. There may be several START files on disk, but they must be in separate directories.
(This feature can only be used with EXOS version 2.1 and beyond. See appendix D.)
Appendix F. Using EXDOS system variables
The standard Enterprise computer contains a feature known as EXOS variables. Many special controls can be given to the computer through use of these variables, which are usually only altered by machine code programs - although a number of SET commands of BASIC in fact use these variables directly.
EXDOS implements a special VAR command to permit direct changing or display of EXOS variables. This command is explained in the reference section, although it should be used with care as it can have some very dramatic effects on the computer if used unwisely.
For full information about EXOS variables, you should refer to the Enterprise Technical Manual, but there are a few new variables implemented by EXDOS which you may wish to use:
Number Name Explanation
70 VERIFY EXDOS verify flag (0=on, 255=off)
When set ON causes verification after every disk
write operation.
Default is OFF.
73 STEP_RATE Step rate for all disk drives
(0=6ms, 1=12ms, 2=20ms, 3=30ms)
Default is 0.
74 DSK_CHK Normal disk change checking for already open files.
(0=on, 255-off)
Default is ON.
89 DCH_DIS Ignore disk change signals from drive hardware.
(0=on, 255=off)
Default is ON.
79 DT_FORM EXDOS date and time format (see below).
EXDOS command interpreter date and time format
Whenever a date or time is printed (such as in the DATE and TIME commands and in the DIR command), the format of the output is controlled by the variable DT_FORM (number 79). The format expected as input to the DATE and TIME commands is also controlled by this variable.
The bottom 6 bits of the variable control the date format, and are considered as three two-bit fields, each of which normally has a value of 1, 2 or 3. The position of the fields in the byte corresponds to the position of the output or input digits, the least significant two bits, for example, thus corresponding to the right hand pair when the date is printed.
A value of 1 indicates that the current day will be printed in the corresponding output field, a value of 2 means the current month value, and a value of 3 means the current year value. Thus it is possible to define any date format. The required values for the three usual formats are tabularised below for convenience. If all fields are zero (the default condition), then the format will default to the UK format (DD-MM-YY). If any one field is zero, than a zero will be printed in that position on output, and the corresponding value ignored on input.
The top bit of the variable controls the time format (ie. 12-hour or 24-hour). If reset (the default condition) then the time will be printed as a 12-hour time followed by 'a' or 'p' for am. or pm. Otherwise the time will be printed in 24-hour format with no 'a' or 'p'. Note that the time can be input in either format unambiguously.
The following table gives the necessary values for the variable to obtain the three common date formats in 12- or 24-hour time formats.
Date/ Time format 12 hour 24 hour
UK (DD-MM-YY) 27 155
American (MM-DD-YY) 39 167
ISO (YY-MM-DD) 57 185
Appendix G. Errors during operation
Various error conditions can occur when using EXDOS. Informative error messages are given in these circumstances, and are often accompanied by a prompt such as:
Ignore, retry or abort, (I,R,A)?
In these circumstances, you may be able to correct the error - by, for example, changing the disk in the drive. You can then press R for Retry, A for Abort or I for Ignore. The I option should be used with extreme caution, as it causes the operating system to skip a checking process, and may leave an error on the disk.
Note that the [ENTER] key can also be pressed for Retry, and the [ESC] key for Abort.
Below is a more detailed explanation of the error messages you are likely to see. The EXTYPE is the error number which could be used if checking for the error in a BASIC program.
EXTYPE
9207 *** File not found
The specified file does not exist in the directory. In
this context `file' can also mean a directory.
9190 *** No RAM disk
An attempt to access the RAM disk when there is no memory
allocated to it. This is an Abort/Retry error.
9186 *** Not ready
The disk drive did not respond. Usually means that there
is no disk in the drive. This is an Abort/Retry error.
9185 *** Verify error
Only occurs if the verify flag is on. Means that data read
back from disk did not agree with what was written. This
is an Abort/Retry error.
9184 *** Data error
Required sector could not be read from the disk usually
means that the disk has been damaged. This is an
Abort/Retry error.
9183 *** Sector not found
Required sector could not be found on the disk. Usually
means that the disk has been damaged. This is an
Abort/Retry error.
9182 *** Write protected disk
Attempt to write to a disk which has the write protect tab
on. This is an Abort/Retry error.
9181 *** Unformatted disk
Attempt to read or write to a disk which is completely
unformatted. This is an Abort/Retry error.
9180 *** Not a DOS disk
The disk in the drive is formatted, but is not compatible
with EXDOS. This is an Abort/Retry error.
9179 *** Wrong disk
When the disk in the drive has been changed when EXDOS is
in the middle of a disk operation. This is an Abort/Retry
error.
9178 *** Wrong disk for file
Very similar to 9179 but means that the disk has been
changed since the file was opened. This is an Abort/ Retry
error.
9175 *** Invalid drive
Attempt to access a drive for which there is no unit
handler.
9174 *** Invalid parameter
Parameter to an EXDOS CLI command did not make sense.
9173 *** Root directory full
Only the root directory can ever get full, sub directories
are extended as required.
9172 *** Disk full
9171 *** Duplicate filename
Results from a RENAME or MOVE function if it would create
a duplicate filename in a directory.
9170 *** Directory not found
A sub-directory item specified in a pathname string does
not exist.
9169 *** Invalid directory move
Results from an attempt to move a sub-directory into one
of is own descendent sub-directories.
9168 *** Invalid pathname string
Results from any error in a pathname string such as an
ambiguous item, a pathname which is too long or any
spurious characters on the end of a pathname string.
9167 *** Read only file
An attempt to write to or delete a file which has its
read-only attribute bit set.
9166 *** Invalid filename
An attempt to create an invalid filename. Can result from
any invalid filename characters in an FCB or a RENAME
which would put embedded spaces in the filename.
9165 *** Directory not empty
Attempt to remove a sub-directory which is not empty.
9164 *** Disk operation aborted
Returned if the user aborted as a result of an Abort/
Retry or Ignore, retry or abort prompt.
9162 *** Invalid MAPDISK Attempt to map a physical unit number
which does not exist.
9161 *** Invalid file attributes
Attempt to access a file as a sub-directory or viceversa.
9159 *** Wrong number of parameters Either too few parameters
were given to a command, or there are characters left over
after all parameters have been decoded.
9158 *** Invalid . or .. operation
An attempt to do something illegal with the special '.'
and '..' entries in a sub-directory, such as renaming or
moving them.
9157 *** RAM disk already exists
Attempt to allocate segments to the RAM disk when it
already has some. Segments must be deleted first
(/D option on the RAMDISK command).
9156 *** Command too long
An EXDOS CLI command was longer than the maximum allowed
length of 128 characters.
9153 *** System file exists
Attempt to create a file or directory when a system file
of that name already exists.
9152 *** Directory exists
Attempt to create a file or directory when a directory of
that name already exists.
9151 *** File exists
Attempt to create a sub-directory when a file of that name
already exists.
9150 *** Incompatible disk
Attempt to access a valid DOS disk in a drive which is not
capable of reading it. This can be a double sided disk in
a single sided drive or an 80 track disk in a 40 track
drive. This is an Abort/Retry error.
9149 *** File cannot be copied onto itself Attempt to copy a
file into a file of the same name in the same directory.
Appendix H. EXDOS command summary.
The following is a list of all the EXDOS commands available and a summary of their syntax and purpose.
CD [d:] [path]
Displays or changes the current directory.
CHDIR [d:] [path]
Displays or changes the current directory.
CLS
Clears the screen.
COPY source [/A][/H] [desz[/A][/T]
Copies data from a file, device or channel to another file,
device or channel.
DATE [date]
Displays or sets the current date.
DEL [d:][path][filename][/H]
Deletes all files which match the path/filename.
DIR [d:][path][filename][/H][/W]
Displays the names of files on disk.
ECHO [text]
Prints text (comments, instructions etc.) in an EXDOS.INI
batch file.
ERA [d:][path][filename][/H]
Deletes all files which match the path/filename.
ERASE [d:][path][filename][/H]
Deletes all files which match the path/filename.
EXDOS [device : filename : channel]
Initialises the EXDOS system and runs simple batch files.
FORMAT [d:][filename][/1][/H][/8]
Formats a disk.
ISDOS [d:][/command]
Boots IS-DOS from disk.
LOAD device : filename : channel
Loads an EXOS module via EXOS.
MD [d:]path
Creates a new sub-directory.
MHDIR [d:]path
Creates a new sub-directory.
MOVE [d:][path][filename][/H] [d:][path]
Moves files from one directory to another on a disk.
MVDIR [d:][path][/H] [d:][path]
Moves sub-directories from one directory to another on a
disk.
PAUSE [text]
Prints a message and prompts the the ENTER key to be
pressed.
RAMDISK [number][/D]
Creates or destroys the RAM disk.
REM [characters]
Allows comments to be put in EXDOS batch files.
REN [d:][path][filename][/H] [d:]filename
Renames one or more files.
RENAME [d:][path][filename][/H] [d:]filename
Renames one or more files.
RD [d:][path][/H]
Removes one or more sub-directories.
RMDIR [d:][path][/H]
Removes one or more sub-directories.
RNDIR [d:][path][/H] [d:]filename
Renames one or more sub-directories.
[d:][path][filename][/H]|channel|device
TIME [time]
Displays or sets the current time.
TYPE [d:][path][filename][/H]
I channel I device Displays data from a file or an EXOS
device or channel.
VAR number [number]|[ON]|[OFF]]
Displays or sets the value of an EXOS variable.
VOL [d:][volname]
Displays or changes the volume name on a disk.
A
Adaptor. 11-13, 78
Appendices. Y5
Apricot computers. 3, 85
Atari 520ST computer. 3
Auxiliary power socket. 78
B
Back up. 6, 33
BASIC 8, 17-18, 25-26
Batch files. 87-88
C
Capacities. 2
Channels. 39,43
Clearing screen. 42, 99
Cold reset. 15, 83-84
Colon. 17
Command interpreter. 9, 17, 27, 53-54
Commands:- 37-74, 99-105
general rules. 40
summary. 99
CD 41, 99
CHDIR 41, 99
CLS 42, 99
COPY 43-46, 99
DATE 47, 91, 100
DEL 48, 50-52, 100
DIR 48-50,100
ECHO 50, 100
ERA 51, 100
ERASE 51,100
EXDOS 1, 53-55,101
FORMAT 55-56, 101
IS-DOS 57-58, 101
LOAD 58-59, 101
MD 59-60, 102
MKDIR 59-60, 102
MOVE 60-61, 102
MVDIR 61-62, 102
PAUSE 63, 102
RAMDISK 64-65, 103
REM 65, 103
RENAME 66-67, 103
RMDIR 67-68, 104
RD 68-69, 103
RNDIR 68,69, 104
TIME 69-70,91, 104
TYPE 71-72, 104
VAR 72-73, 104
VOL 73-74, 105
Connecting system and drives. 10-13
Connectors. 12-13, 76-78, 81
Copying:
disks. IS-DOS manual
files. 33-35
CP/M. 1
D
Data:
portability. 3
storage 5
DATE. 23, 47-48, 91, 100
Deleting:
files. 51-53, 100-101
directories. 67-68, 104
Device. 28, 33, 39, 44
Directory. 21-23
Directories:- 21-23, 30-33, 37, 48-50
creating. 30-33, 59-60, 102
hidden. 59-61, 67
moving. 61-62,102
paths. 29-35, 37
parent. 37
renaming. 66-67, 103
root. 32
sub- 30-32
Disks:
care of. 6
double sided. 1, 2, 19
formatting. 5, 19-21, 55-56, 101
from other computers. 3. 85
inserting. 19-20
single sided. 1, 2, 19
sizes. 1, 2
write protecting. 7
40 track. 1, 2, 3, 19
80 track. 1, 2, 3, 19
Drives:
changing logged. 24-25
choice of. 3-4
configuring. 81
designations. 10
names. 10, 37
sizes. 1, 2
tested with Enterprise. 80
with Disk Change signal. 82-83, 90
E
Enterprise Programs. 2, 3
Enterprise 64. 86
Error message. 92-98
EXDOS:- 1. 53-55, 101
variables. 81, 89
EXOS: 8, 47, 69, 72, 86
variables. 89
version 2.0 86
EXT command. 25-26
F
Files:- 8, 9, 27
batch. 87-88
copying. 43-46. 99
deleting. 51-52, 100
hidden. 43-46, 52, 66
loading. 1, 22, 26, 58
management of. 29, 35
moving. 60-61. 102
naming. 23-24.. 38
renaming. 66-67. 103
saving. 1. 22. 26
Filenames. 22-26. 38
Formatting disks. 5, 19-21. 55-56
G
H
Help. 16
Housekeeping. 33-35
I
IBM PC. 3. 85
Installation:
instructions. 10-13
problems. 15, 81
Interface pack, contents. 11
IS-DOS. 1, 6. 57
J
K
L
LED indicators,
on computer. 13, 14
on drives. 13, 14, 15
Loading files. 1, 26, 58
M
Making directories. 31, 59-60, 102
MAPDISK. 4, 84 & IS-DOS manual
Moving directories. 60-61, 102
MS-DOS 1, 3
MSX computers. 3
N
Notations, in Command Ref. section. 36-39
O
P
Parent directory. 37
Path. 29-35, 37
PAUSE command. 63, 102
Powered drives. 2
Power socket, auxiliary. 78
Power supply requirements. 2, 80
Power supply connections, 'BBC' drives. 81
PRINTing to disk. 28, 87-88
Q
R
RAMdisk 16, 37, 64-65, 85-86, 103
Read only files. 6 & IS-DOS manual
REMark 65, 103
Removing directories. 67-68
Renaming directories. 68-69, 103, 104
Renaming files. 66-67, 103
RM Nimbus computer. 3
Root directory. 32, 87
S
Saving files. 1, 22-26
Sectors. 5, 9
Serial device. 44
Shugart 410. 2, 76-78
Single disk systems. 4, 84
Specifications:
for drives. 79
WD1770. 78
START files. 88
Step rates. 82, 89
Sub-directories. 30-31
System variables. 89
T
Tape usage. 26
Terminating resistors. 10, 81
Tested drives. 80
Testing system. 13-16
TIME. 23, 69-70, 90-91, 104
Tracks. 1, 2, 3, 5, 19
TYPE command. 28, 71-72, 104
U
Unpowered drives. 80
Use with Enterprise 64. 86
Using single disk drive. 4, 84
V
Verify. 89
VOLume. 73, 85, 105
Volume identifier. 85
W
Western Digital WD1770. 78
Wildcards. 34-35, 86
Word processor. 4, 27-28, 32, 87
Write protecting. 7
X
Y
Z
Text by Robert Madge and Steve Groves.
Typesetting by Words & Pictures Ltd.
![]()